Table of contents
- What Is FTP
- FTP Modes
- FTP Firewall Rules
- FTP Over SSL
- Installing IIS FTP Server
- Firewall Settings
- Creating IIS FTP Server
- FTP Firewall Support
- FTP Authentication
- FTP Authorization
- FTP Request Filtering
- FTP IP Address & Domain Restrictions
- FTP User Isolation
- FTP Virtual Host Names
- FTP SSL Settings - Explicit & Implicit FTPS
- FTP Logging
- Resources
Introduction
This guide aims to give you a comprehensive, yet not exhaustive, knowledge in managing IIS FTP Server. We will review basic concepts of FTP, how to create an FTP Server using IIS and how to manage it. I hope you can get a thing or two from this guide!
What Is FTP?
It stands for File Transfer Protocol, and it is used to transfer files across the Internet. This uses TCP/IP protocol.
FTP is built on a client-server model architecture, where there is an FTP client and there is an FTP Server. In this model, the “client” is the one requesting something, while “server” is the resource providers. So, the client requests something that server has. Say you want to download some file. So, you open an FTP Client (WinScP, Filezilla or other), and you connect to the FTP Server which has the file that you want. This protocol uses two channels/connections:
-
Command port (control channel): where commands are transferred.
-
Data port: where actual data is being transferred. What type of commands are we talking about?
- PASS => ask for password from user.
- SYST => asks for system information about the client.
- USER => asks for username.
Among many others.
These types of commands are the ones being transferred in the control channel.
By default, TCP port 21 is used for the control channel, and the data connection channel is determined by the method that the client uses to connect to the server: active or passive.
In this guide we will take a deep look at FTP and FTPS. However, I do want you to be aware of the existence of SFTP (we will explain this a bit later on) and TFTP (Trivial File Transfer Protocol). This is out of the scope of this guide because IIS does not support these protocols.
IIS supports FTP and FTPS.
Also, remember TCP has 65535 available ports. Each computer has these ports. Some ports are reserved, ephemeral, assigned, etc.
Why do we need ports? [Refresher]
Ports are used to differentiate each service running on each port.
For example, HTTP traffic happens over port 80 (this is the default).
-
Client goes out from its own random port (let us say 49000) and connects to port 80 in Server.
-
Server replies from its own port 80 to the random port the Client connected from (49000). In the above example, what would happen if the Client sent the request to port 86 of the Server? Communication would have failed because the Server hosts his HTTP site over port 80, they have no service running on port 86.
FTP Modes
There are two modes in FTP: active or passive. The practical difference is who initiates the data channel. In Active mode, the one initiating the data channel is the FTP Server. In contrast, in Passive mode, the one initiating the data channel is the FTP Client.
Remember there are two channels in an FTP communication: control channel, and data channel. In both modes, the FTP client initiates the control channel. This should come as no surprise as the one that always begins communication is the one that requests something: client. Now, the key difference between the two modes is who initiates the data channel.
Active Mode
In this mode, the one initiating the data channel is the FTP Server.
The FTP Client tells the FTP Server, by sending “PORT” command, which port client is listening for data channel. Then, FTP Server will connect to this port to begin data transfer.
Active mode is the oldest one, and it is not recommended in Internet scenario as much of the needed configuration relies on clients and intermediates devices. So, we should really be using passive mode. However, it is important to understand the flow of requests in this mode.
A simplistic example of the flow:
-
FTP Client initiates command channel from a port greater than 1023 TO port 21 in FTP Server.
-
FTP Server received message.
-
FTP Client sends “PORT” command which tells the FTP Server which port the FTP Client is listening to for data channel.
-
FTP Server initiates data channel FROM port 20 to the port specified in the “PORT” command.
-
Data transfer can begin.
Let us see another example:
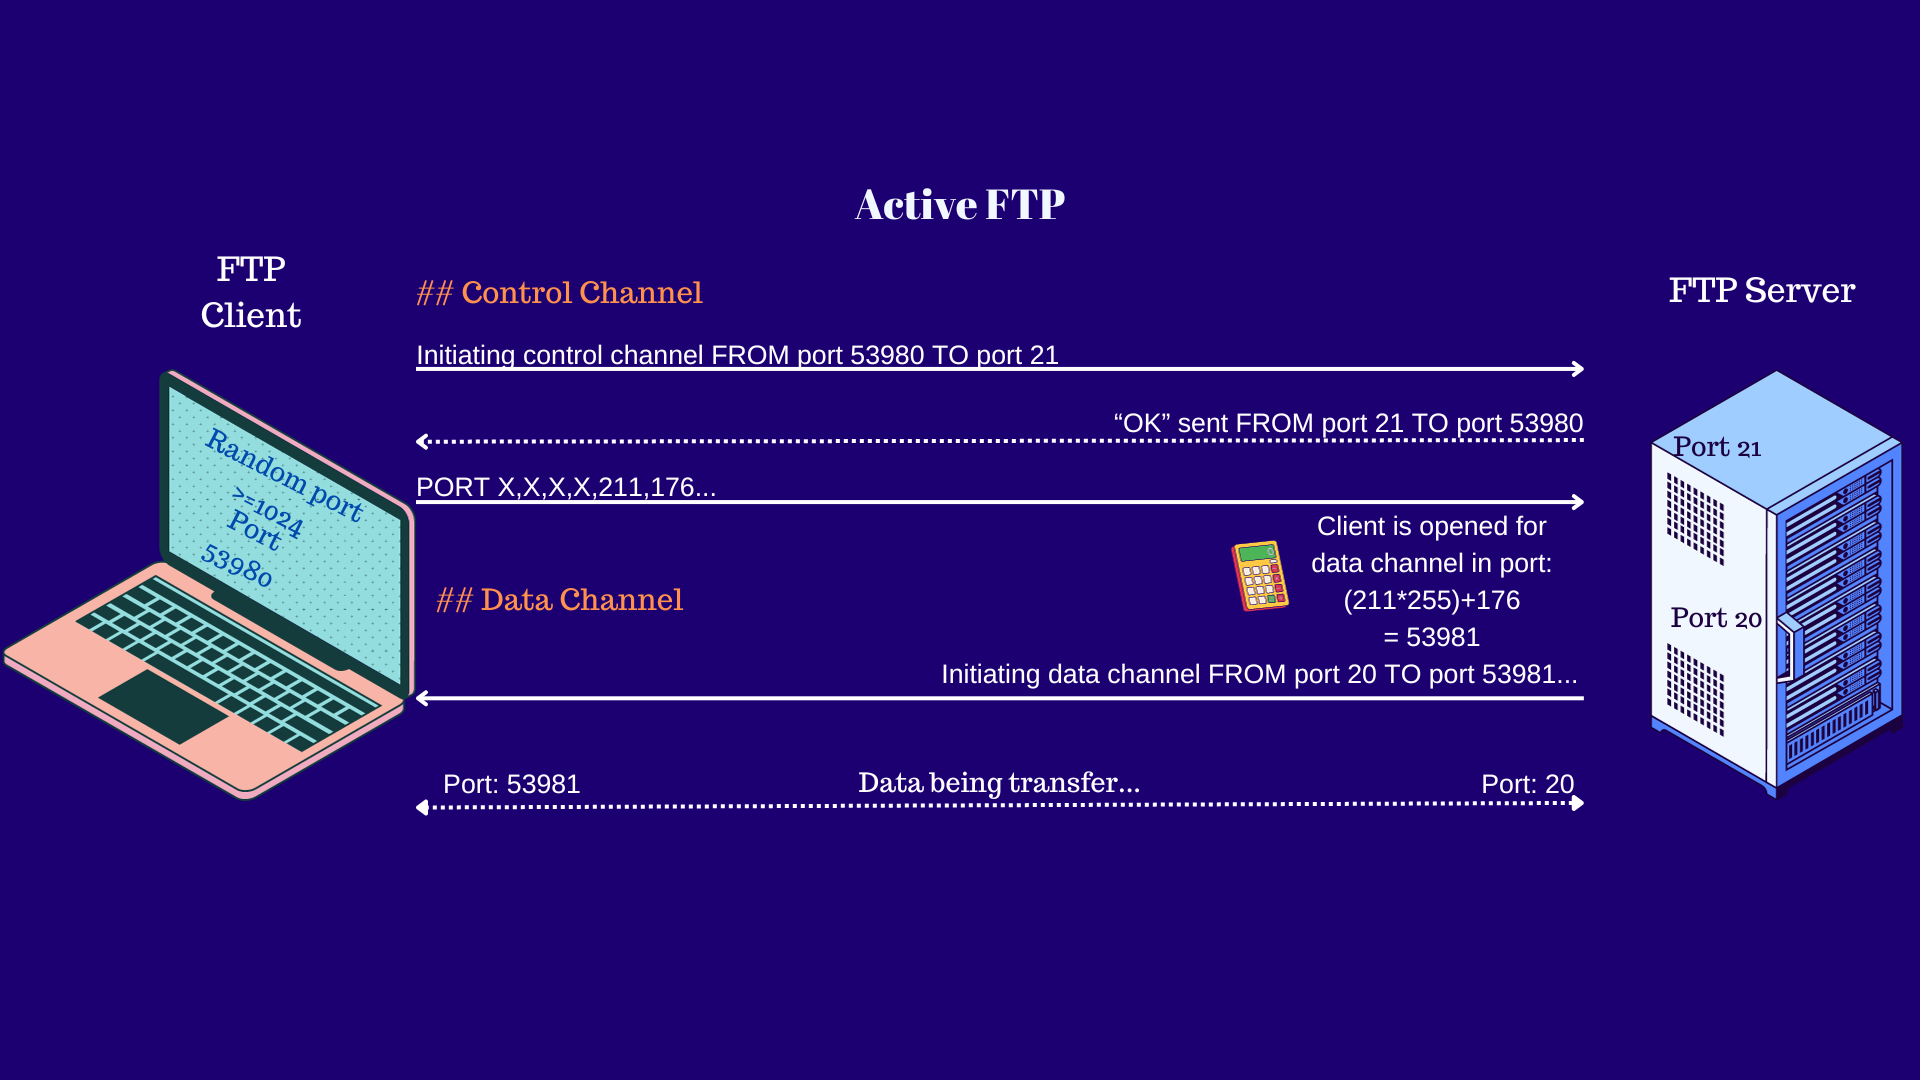
- FTP Client connects FROM a random port >=1024 TO port 21 (control channel) in the FTP Server.
-
Say FTP Client used random port 53980 as outgoing port and connected to inbound port 21 in FTP Server.
-
From this point on, FTP Server knows that, for command channel, it must respond back to port 53980 in FTP Client.
-
FTP Client also sends command “PORT X,X,X,X, Y1,Y2” where it tells the FTP Server which IP and port the FTP Client is listening to for the data channel. First four digits will be the IP Address, and then to get port for data channel, formula is “(Y1 * 255) + Y2”.
-
So, if we had “PORT X,X,X,X,211,176”, data channel port would be “(211*255)+176 = 53981.If you noticed, the data channel end up being “Random Port=1”.
-
-
FTP Server initiates data channel FROM port 20 TO port that the FTP Client specified in the “PORT” command. In this case port 53981 .
- Server remembers port for data channel and knows it needs to get back to FTP Client at port 53981.
- Data transfer begins.
In Summary:
-
Active mode is legacy and does not perform well in Internet scenarios.
-
FTP Server initiates the data channel. It connects to the port that the FTP Client specified in the “PORT” command for data transfer.
Passive Mode
In this mode, the one initiating the data channel is the FTP Client.
The FTP Client sends “PASV” to enter Passive mode and asks the FTP Server which port, or range of ports, can the client connect to for data channel.
FTP Server responds to which port, or range of ports, can the FTP Client connect to for data channel. Then, the FTP Client initiates the data channel to one of those ports.
This is the recommended method given that configuration only lies at Server and avoids possible Firewall or other devices issues.
Example:
-
FTP Client sends requests from port greater than 1023 TO port 21 in FTP Server.
-
Server receives message and control channel is established.
-
FTP Client sends “PASV” command to switch to passive mode and ask the FTP Server which port(s) it is listening to for data channel.
-
FTP Server replies with port(s) opened for data channel.
-
FTP Client initiates data channel by connecting to port FTP Server specified before.
-
Data transfer begins.
Another example:
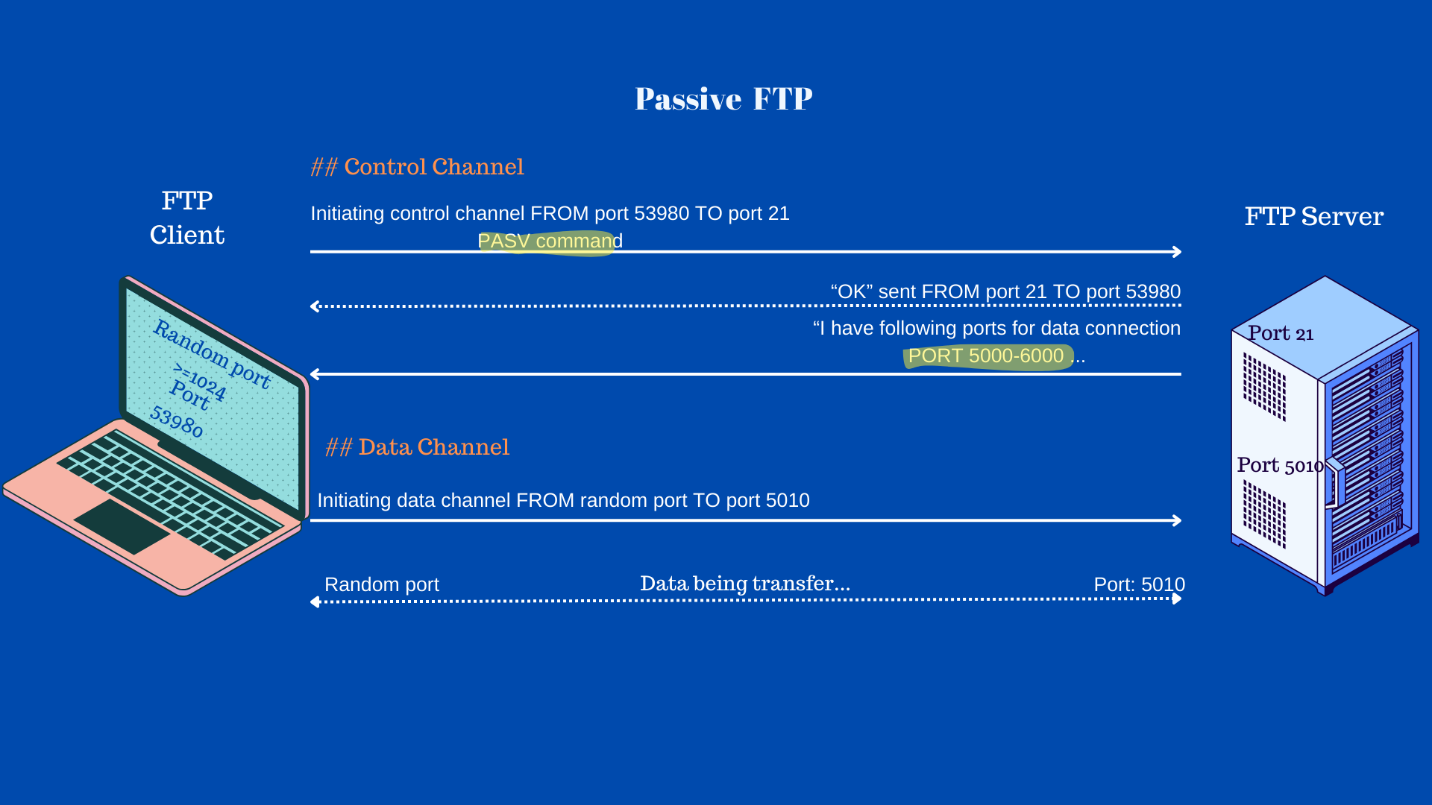
- FTP Client initiates command channel FROM port 53980 TO port 21.
- It also sends PASV command, indicating the server it wants to switch to a passive connection and ask Server to send data port channel it has opened.
- FTP Server responds FROM port 21 TO port 53980.
- Server replies with a range of ports it has open for data channel. Example 5000-6000.
- FTP Client initiates the data channel to one of those ports.
- Initiating data channel FROM random port TO port 5010.
In Summary:
-
Passive mode is the standard and recommended in internet world scenarios.
-
FTP Client initiates data channel. It connects to a port that FTP Server previously told client to connect for data channel.
FTP Firewall Rules
We will actually look at these Firewall rules later on.

FTP over SSL
Communications nowadays should be encrypted. Data sent over plain FTP is not secured. Securing communication adds an extra level of security that we may add to protect our data. Just for clarification purposes, SSL and TLS can be understood as interchangeably. SSL protocol was created by Netscape, then it was given to the Internet Engineering Task Force (IETF) that defined a new standard in 1999 called TLS 1.0 (which would have been SSL 3.1, if sticked to that nomenclature) but basically it is the “continuation” of SSL.
FTP can be encrypted in two ways:
-
Using Secure Shell Protocol (SSH)
-
Using Secure Sockets Layer (SSL/TLS).
Depending on which protocol FTP you choose, it is technically called in a different way.
When it uses SSH, it is called SFTP. This happens over port 22.
When it uses SSL, it is called FTPS. This happens over port 990 or any other port (We will address this later).
As IIS can only support FTPS, I will focus in FTPS, NOT SFTP.
Why?
IIS FTP Server cannot do SFTP, that is FTP over SSH. When I say “cannot do” what I mean is that IIS FTP Server simply does not have the functionality to do SFTP. So, every attempt to do FTP over SSH in port 22 will inevitably fail.
When doing FTPS we have two options: i) implicit; ii) explicit. This has nothing to do with the FTP modes we were talking about (active, passive). Both options are encrypted and are secured. The practical difference is when encryption starts.
Implicit FTPS
This is an older form of FTP over SSL. With implicit FTPS the SSL handshake must be negotiated before any FTP commands can be sent. In other words, encryption starts from the very beginning, before FTP Client initial commands.
This happens exclusively over port 990. Implicit FTPS can only happen over port 990.
With implicit FTPS the whole session, that is both control and data channels, are encrypted right from the start.
The actual protocol used is “ftps://”.
So, a simplistic view of implicit FTPS:
-
FTP Client connects to FTP Server over port 990 & SSL handshake immediately happens.
-
Communication resumes.
In Summary:
-
In implicit FTPS, SSL handshake happens before FTP client can send any commands.
-
Implicit FTPS can only happen over port 990.
-
The protocol for implicit FTPS is “ftps://”.
Explicit FTPS
With explicit FTPS is the FTP Client who explicitly sends “AUTH TLS” command and requests Server for a secured connection.
Explicit FTPS can happen on any port other than 990 (well, and 22 because this is SSH). Port 990 is reserved for implicit FTPS.
With explicit FTPS we have more flexibility to determine which parts of our session must be encrypted. Client can negotiate with the Server to only secure control channel, or secure data channel, or secure both channels.
The actual protocol used is called “ftpes://”.
So, a simplistic view of explicit FTPS:
-
FTP Client connects to FTP Server.
-
FTP Client requests FTP Server for a secured connection.
-
SSL handshake happens
In Summary:
-
In explicit FTPS it is the FTP Client who explicitly requests the FTP Server to establish a secure connection.
-
Explicit FTP can happen on any port other than 990.
-
The protocol for explicit FTPS is “ftpes://”.
Installing IIS FTP Server
IIS comes with the OS. You cannot download a specific IIS Version. IIS version is tied with OS version.
IIS is part of the OS. When we say “installing”, is more like “activating”, as IIS is already part of the OS itself. Hence, if there is something wrong with IIS installation, chances are image is corrupted and who knows what else might be failing in your machine and IIS is just another victim.
Here you can see a list of IIS version per OS:
My main environment for this guide will be a new Windows Server 2022.
Powershell:
You can add “-whatif” option to see what would happen if command is executed, without actually making any changes to machine.
# Install IIS & FTP Features
Install-WindowsFeature -name  Web-Server,Web-Ftp-Service,Web-Ftp-Ext -IncludeManagementTools

# Install FTP Features
Install-WindowsFeature -name Web-Ftp-Service,Web-Ftp-Ext

# Uninstall FTP Features
Uninstall-WindowsFeature -name Web-Ftp-Service,Web-Ftp-Ext
How do we get the actual name of each feature?
Open PowerShell and run the following command, identify feature and middle column correspond to actual name of feature.
Get-WindowsFeature
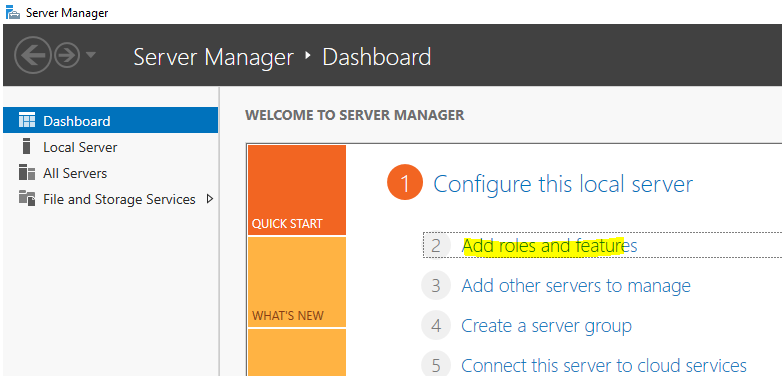
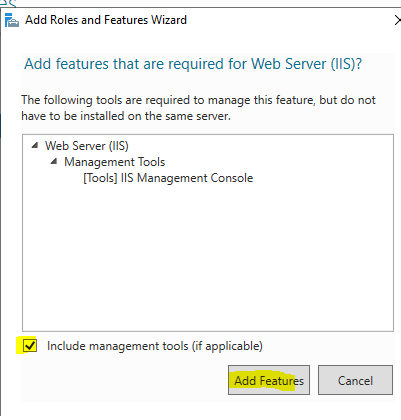
Server Manager:
Installing IIS and FTP features. If IIS is already installed just skip to where you select what features of IIS you want to install.
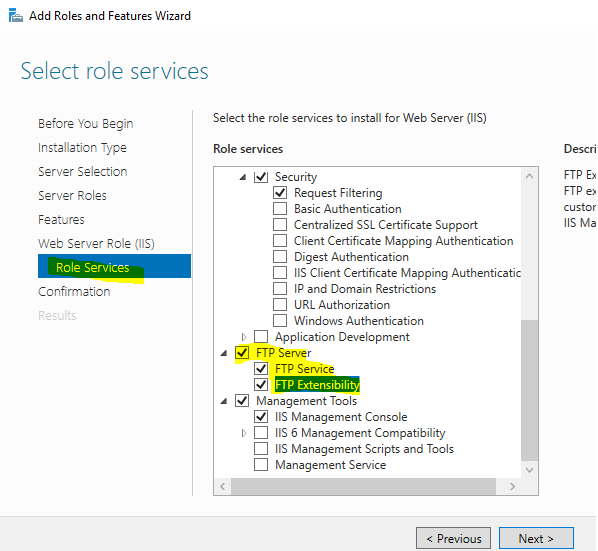
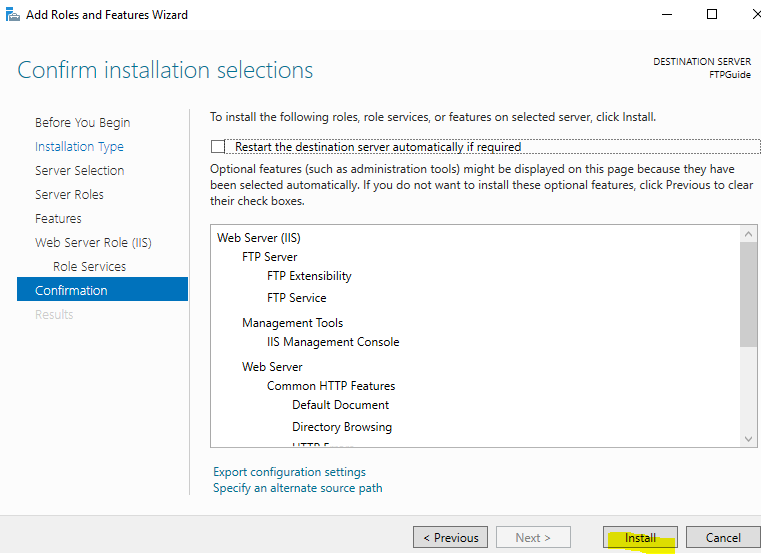
Server Manager > Add roles and features > Next > Next > Next > [X]Web Server (IIS) > (Add Feature) > Next > Next > Next > FTP Server > [X] FTP Service & [X] FTP Extensibility > Next > Install.

Select FTP features.
Firewall Settings
As soon as we installed IIS FTP role, it made several rules in our Firewall rules.
Open “Windows Defender Firewall with Advanced Security”.

I would not advise modifying these rules. If, for some reason they are not present, you can either re*install FTP feature, or you can create them manually. But these rules must be present.
Also, these rules must be present in intermediate devices such as a Load Balancer. Otherwise, traffic will not flow as it should. Especially opening port 21 and opening range for data channel.
Outbound Rules:
-
FTP Server (FTP Traffic-Out): allows outbound traffic over port 20 for “svchost.exe”.
-
FTP Server Secure (FTP SSL Traffic-Out): allows outbound traffic over port 989 for “svchost.exe”. Why 989? Well, in implicit FTPS control channel is 990 and data channel is 989.
Here are the details:
PS C:\Users\azureuser\Documents> Get-Content .\outboundRules.txt | Select-String -Pattern '^FTP Server.*'

FTP Server (FTP Traffic-Out)    FTP Server      All     Yes     Allow   No      %windir%\system32\svchost.exe   Any     Any     TCP     20      Any     Any     Any     Any     None    Any
FTP Server Secure (FTP SSL Traffic-Out) FTP Server      All     Yes     Allow   No      %windir%\system32\svchost.exe   Any     Any     TCP     989     Any     Any     Any     Any     None   Any
Inbound Rules:
-
FTP Server (FTP Traffic-In): allows inbound traffic over port 21 for “svchost.exe”.
-
FTP Server Passive (FTP Passive Traffic-In): allows inbound traffic over port ranges 1024-65535 for “svchost.exe”. These are the ports opened for data channel, you can see that, at Firewall level, it opens whole range. But we can narrow the range from IIS Itself.
-
FTP Server Secure (FTP SSL Traffic-In): allows inbound traffic over port 990 for “svchost.exe”. This is the control channel in implicit FTPS.
In case you are wondering, IIS services (W3SVC & WAS) run in “svchost.exe”. This is why the rules are for this process.
PS C:\Users\azureuser\Documents> Get-Content .\inboundRules.txt | Select-String -Pattern '^FTP Server.*'

FTP Server (FTP Traffic-In)     FTP Server      All     Yes     Allow   No      %windir%\system32\svchost.exe   Any     Any     TCP     21      Any     Any     Any     Any     Any     None   Any
FTP Server Passive (FTP Passive Traffic-In)     FTP Server      All     Yes     Allow   No      C:\Windows\system32\svchost.exe Any     Any     TCP     1024-65535      Any     Any     Any    Any      Any     None    Any
FTP Server Secure (FTP SSL Traffic-In)  FTP Server      All     Yes     Allow   No      %windir%\system32\svchost.exe   Any     Any     TCP     990     Any     Any     Any     Any     Any    None     Any
Notice these rules are basically the same as the ones we discussed in “FTP Firewall Rules” section.
Creating & Managing IIS FTP Server
This is our first scenario:
-
The company asked us for an FTP Site configured for passive mode.
-
There are four employees: user1, user2, user3, and user 4.
-
Group “FTPUsersA” contains “user1”, and “user2”.
-
Group “FTPUsersB” contains “user3”, and “user4”.
-
Both groups should have read/write permissions.
-
FTP site should be publicly accessible but only with “read” permissions for those anonymous users.
-
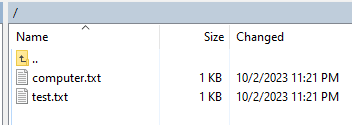
As initial content it should have two files called: “test.txt”, and “computer.txt” with any message.
-
The user “user3” should not have access to file “test.txt”, only to “computer.txt”.
Creating IIS FTP Site
Before learning to manage our FTP site, we first need to create one!
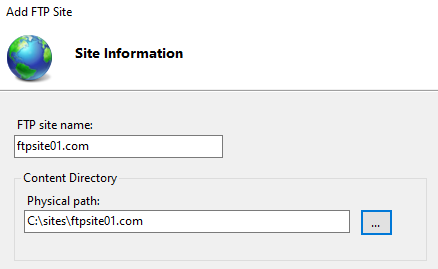
I will create directory “C:\sites\ftpsite01.com”, this will be the root folder for our FTP Site.
PS C:\> mkdir -p sites/ftpsite01.com
    Directory: C:\sites
Mode                 LastWriteTime         Length Name
----                 -------------         ------ ----
d-----         10/2/2023   7:36 PM                ftpsite01.com

PS C:\> ls .\sites\
    Directory: C:\sites
Mode                 LastWriteTime         Length Name
----                 -------------         ------ ----
d-----         10/2/2023   7:36 PM                ftpsite01.com
Inside “ftpsite01.com” I will create the “test.txt”, and the “computer.txt” files.
Like so:

We have the folder structure. Now it is time to create IIS FTP Site.
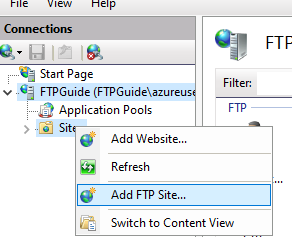
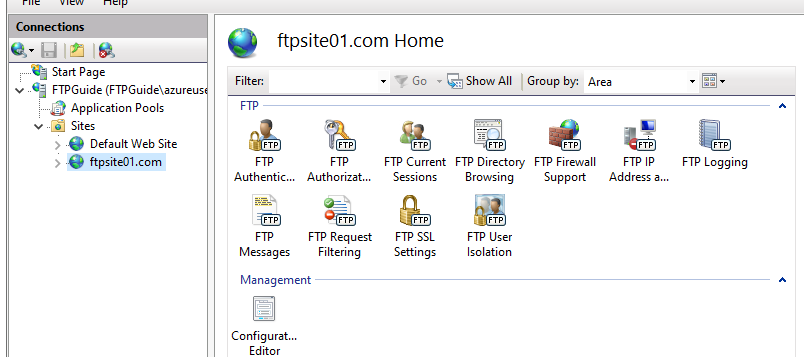
Open IIS Manager > Expand Server > Right click on “Sites” > Add FTP Site.
Give it a name and its physical location.
Leve default Binding over port 21.
Select “No SSL”.
Authentication: Anonymous.
Permissions: Read.
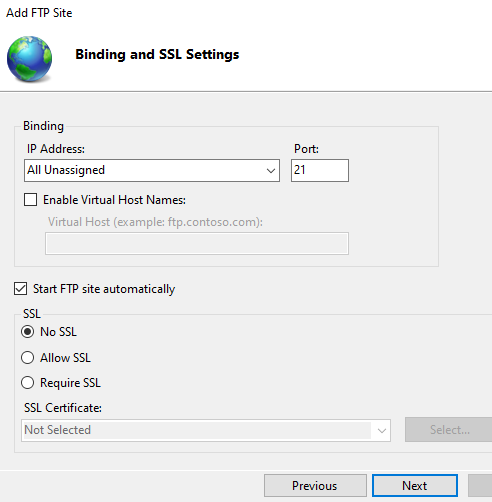
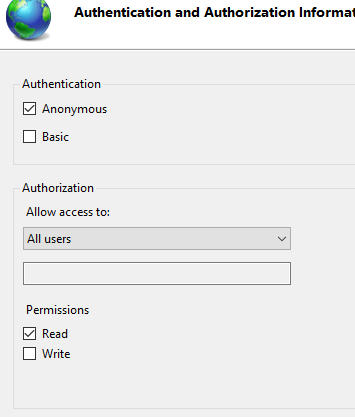
If done correctly, we have created an FTP Site listening over port 21, with anonymous authentication (meaning everyone can access), but users only have “read” permissions.
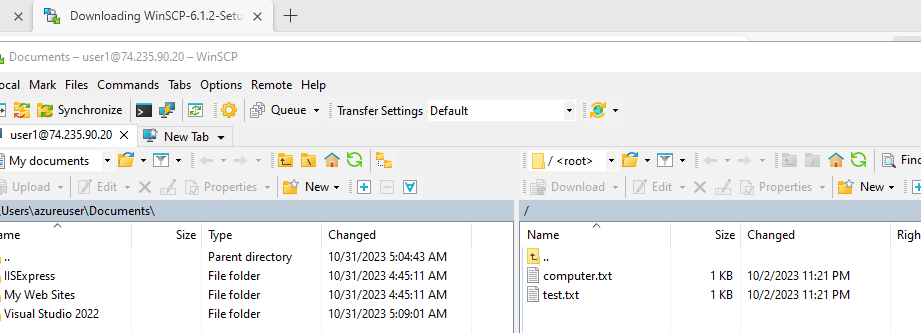
At this point I would like to test if this basic site is working or not. To do this we need an FTP Client. Windows comes with an FTP Client: “C:\Windows\System32\ftp.exe”.
PS C:\Windows\System32> ls | findstr "ftp.exe"
-a----          9/6/2023  12:06 AM          51712 ftp.exe
We can test with this FTP Client. However, do not be surprised if this fails for you as ftp.exe has two main limitations:
-
It does not support FTPS.
-
It does not support Passive mode.
In other words, the real test is by using an FTP Client that supports the above settings. Like “WinScP” or “FileZilla Client”.
To use ftp.exe open Command Prompt and type “ftp <site name/IP>”. In our case “ftp localhost”. It will then ask you for the username and password. But wait, did we not configured so all users can enter without credentials? Well, yes and no. Everything on a computer needs to be accessed by a user/group. There is no exception to it. When using “Anonymous Authentication” there is no password (you can press enter or put whatever string), however, username is “anonymous”, which by default, will use as identity the virtual account called “IUSR”.
We will dig a bit further in “Authentication” section.
PS C:\Users\azureuser> ftp localhost
Connected to FTPGuide.
220 Microsoft FTP Service
200 OPTS UTF8 command successful - UTF8 encoding now ON.
User (FTPGuide:(none)): anonymous
331 Anonymous access allowed, send identity (e-mail name) as password.
Password:
230 User logged in.
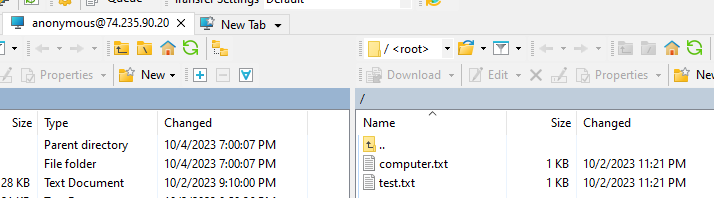
ftp> dir
200 EPRT command successful.
125 Data connection already open; Transfer starting.
10-02-23 11:21PM 16 computer.txt
10-02-23 11:21PM 12 test.txt
226 Transfer complete.
ftp: 105 bytes received in 0.00Seconds 105000.00Kbytes/sec.
Executed “dir” command and we can see both files. If you want to disconnect from the current connection, you can type “disconnect”. Then you can open another connection with “open <sitename/IP>. If you want to completely exit ftp.exe, you can type “bye”.
Great, we know our FTP Site is working at its most basic level. It is always a good idea to start from the most basic setup, test if it works, and then keep adding new configuration and repeat process. In doing so, we would have a pretty good idea where it might have failed.
If for some reason you could not connect with ftp.exe, do not panic just yet! The real test is with a good FTP Client that supports passive mode. But before doing this, we need to configure our FTP Server for passive mode.
Testing basic connectivity with other FTP Clients.
Choose your FTP Client. Both support FTP Passive mode out of the box.
Download WinScP
Open WinScP.
-
Select FTP protocol.
-
Hostname: localhost
-
Username: anonymous
-
Password:
We can login using localhost.

FileZilla Client
Open FileZilla
Host: ftp://localhost
Username: anonymous
Password:
We can login using localhost.


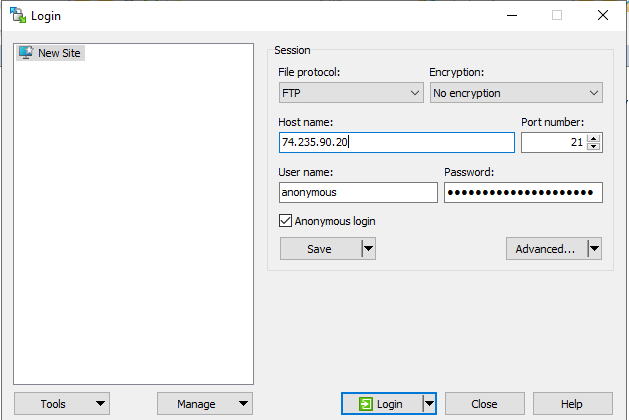
Now, this is great, but we want to connect with the public IP. We need to configure IIS to support FTP Passive mode.
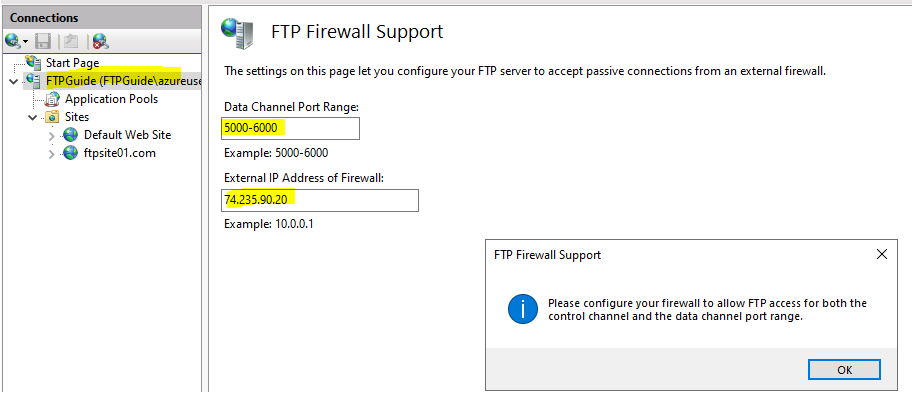
FTP Firewall Support
We just saw that when FTP feature got installed it opened whole range (1024-65535) for data channel.
Ports below 1023 are called system or well-known ports and these cannot be used as data channel well, they are, or could be, in used by a well-known service.
So, we know that at OS level all ports are opened, but we need to configure IIS FTP Server to tell the FTP Client “Hey, I am opened at these ports for data channel”.
Remember that the data channel is where the actual data is being transferred. So, if you open just 10 ports for the data channel, only 10 clients can connect. If you open one port data channel, only one client can connect. You get the idea. In other words, keep in mind how many clients you are expecting.
Open IIS Manager > Server Level > FTP Firewall Support
I will open port range 5000-6000 for data channel.
Set the external IP.
It will display an informational prompt to configure firewall. However, this was done automatically when FTP role was installed.
These settings are inherited by your FTP Site.

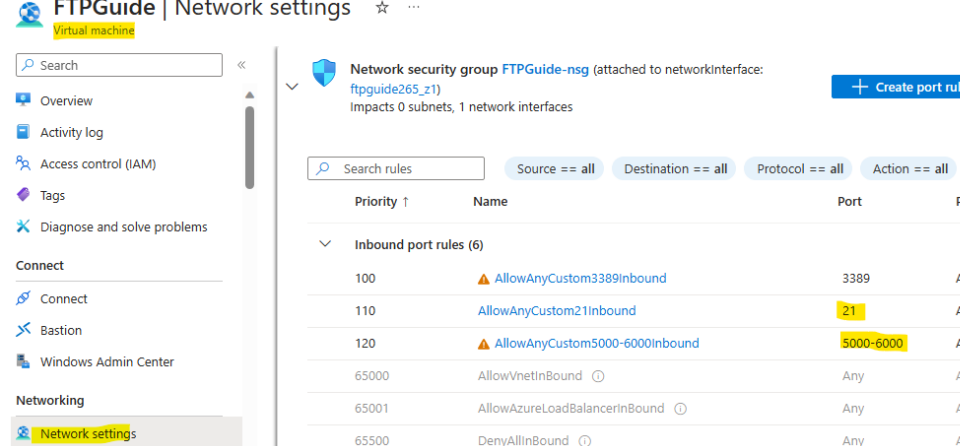
However, we need to do a couple of things before testing. Remember control channel traffic and data channel traffic must flow between client and server. Meaning, we need to apply these same rules, to allow ports, in any device like Load Balancer, VM network settings, etc.
In my case, I need to create inbound rules to open port 21 (control channel) and port range 5000-6000 (data channel) in Azure Portal > VM > Network Connectivity.
Note that, if you have more than one NSG attached, you must configure rules to all of them!
After doing this we need to restart the FTP Service. Every time we change ports, restart “Microsoft FTP Service”.
There are two ways:
- Friendly way to restart FTP Service
Services > Microsoft FTP Service > Restart
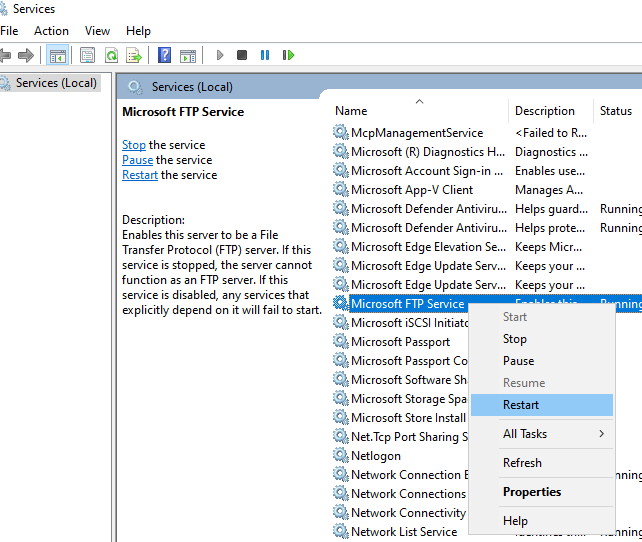
If in doubt, always restart FTP Service. Also make sure your FTP Site is always up!
- Not so friendly way to restart FTP Service
Open CMD as admin.
Use this command to stop it:
net stop ftpsvc
Use this command to start it:
net start ftpsvc

After doing this, open WinSCP or FileZilla and test with the public IP.
I want you to understand that all rules are in line. At VM Level we have incoming rules for port 21 and port range 5000-6000.
In Firewall, we have an incoming rule for port 21 and port range 1024-65535. These rules were automatically created when installing FTP role. Here, OS is opening all range of ports for data channel, however we configured IIS FTP Server to only advertise range 5000-6000 (which is included in 1024-655353, so no problem).
In case you have a device/software, such as Load Balancer, these rules must exist at that level as well. And you may need additional rules if using FTPS. We will deal with this later.
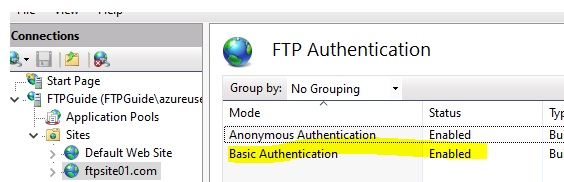
FTP Authentication
Authentication is the process of verifying that the person is who it claims to be. As of right now, we have been using anonymous authentication, meaning any user can access our FTP Server. But we can also use “Basic Authentication”.
You can either decide to use both, Anonymous & Basic Authentication, or just use one authentication method. With Basic Authentication the end user will get prompt for credentials.
FTP Site > FTP Authentication > Basic Authentication (Enabled)
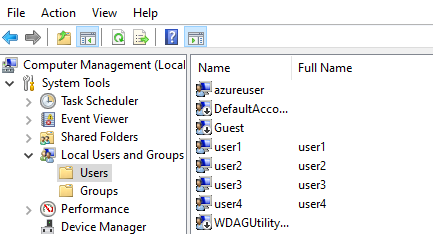
Ok, but wait a minute, if we are asking for user credentials is because those accounts exist. They can either be local accounts or domain accounts. As for this guide, I will create local accounts.
We have been asked to create four users: user1, user2, user3 and user4.
For productions accounts choose correct checkboxes. Computer Management > Local Users and Groups > Users > Create new users.
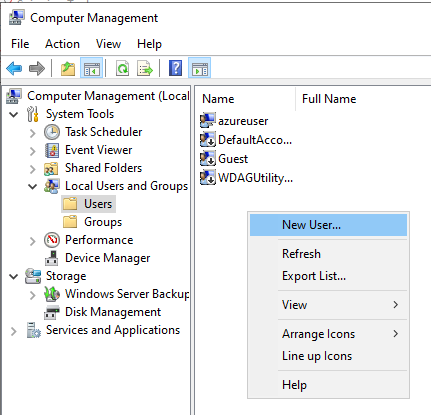

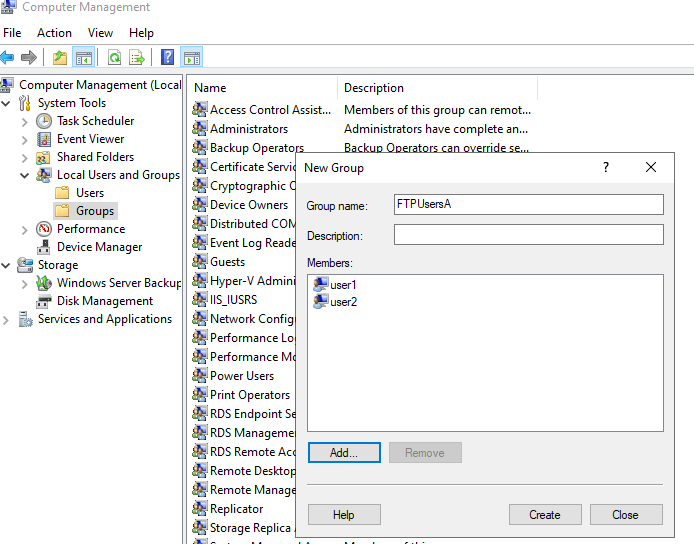
We need to create a group “FTPUsersA” that contains “user1” and “user2”.
We need to create a group “FTPUsersB” that contains “user3” and “user4”.
Computer Management > Local Users and Groups > Groups > Create new groups.
Cool, we now have Basic Authentication setup and we have created users and groups.
But we have not yet configured the authorization part. Every request goes through authentication and then authorization.
FTP Authorization
Authorization happens after authentication.
It is the process of verifying if the user has access to the desired resource.
A normal flow for authorization goes as follows:
- Client Request > IIS Authorization > NTFS Authorization.
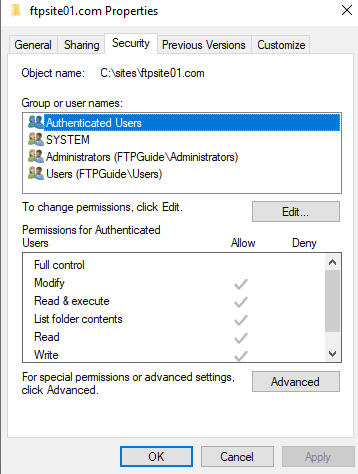
Meaning that we need to configure authorization in two places. If it passes IIS authorization, they it goes to the file system authorization to check if the user is authorized or not.
If IIS authorization succeeds and NTFS fails, operation failed.
If IIS authorization fails, operation failed.
Both permissions must be in synced.
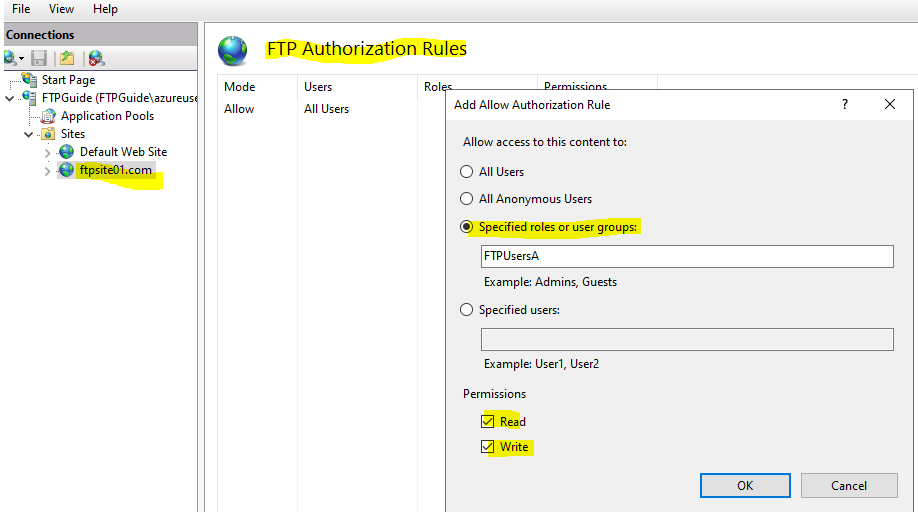
Let us configure IIS Authorization
IIS Manager > FTP Site > FTP Authorization Rules.
Here, you can allow/deny users and groups.
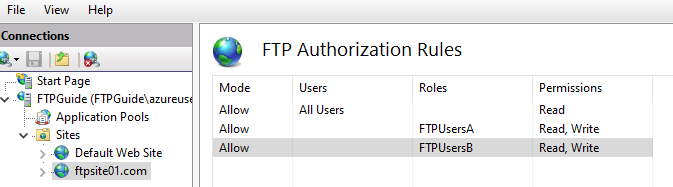
If you look, you will see that there is already a rule to allow a group called “All Users”, this is why Anonymous Authentication works.
Now we just need to add our two groups: “FTPUsersA” and “FTPUsersB” and give them read/write permissions”.
NTFS permissions should already be set because our users will belong to either one of default accounts. However, you may want to allow just specific users. This is up to you.
Let us test.


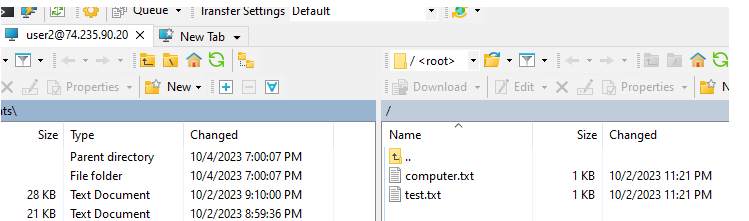
The user “user3” should not have access to file “test.txt”, only to “computer.txt”.
We can set permissions per file basis. Again, you can do this at IIS level or NTFS level. I will do it at IIS level.
IIS Manager > FTP Site > Content View (at the bottom) > [Select file] > Switch to Features View > FTP Authorization Rules > [Deny user3]


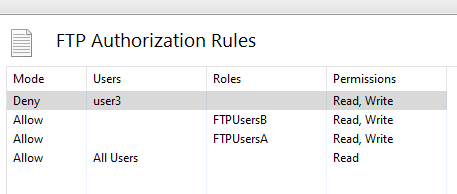
Test.
“user3” should have access to “computer.txt” but not to “test.txt”.


Second Scenario
We have been asked to create a new folder called “_private” and under this new folder a file called “private.txt”. However, any content inside “_private” directory should not be accessed by anyone. As we attempt to add more security to our FTP site, ONLY client IP address “20.55.200.223” is allow access FTP site. Moreover, we should implement user isolation, where each user is put in their respective directory rather than sharing one.
Creating directory “_private”.
Creating file “private.txt” inside “_private” directory.
Adding content to file.
Outputting content to console.
PS C:\sites\ftpsite01.com> pwd

Path
----
C:\sites\ftpsite01.com


PS C:\sites\ftpsite01.com> mkdir _private


    Directory: C:\sites\ftpsite01.com


Mode                 LastWriteTime         Length Name
----                 -------------         ------ ----
d-----         11/7/2023   1:00 PM                _private


PS C:\sites\ftpsite01.com> New-Item -Path ".\_private\private.txt" -ItemType File


    Directory: C:\sites\ftpsite01.com\_private


Mode                 LastWriteTime         Length Name
----                 -------------         ------ ----
-a----         11/7/2023   1:01 PM              0 private.txt


PS C:\sites\ftpsite01.com> "This is private" | Out-File -FilePath ".\_private\private.txt"
PS C:\sites\ftpsite01.com> cat .\_private\private.txt
This is private
FTP Request Filtering
This module allows us to allow or deny requests based on file name extension, hidden segments, URL sequences and commands. As for our example, we need to add a “Hidden Segment”. We want to hide the folder called “_private” and all of its content.
Open IIS Manager > FTP Site > FTP Request Filtering > Add Hidden Segment > _private

If I connect again folder “_private” is not visible anymore.
FTP IP Address & Domain Restrictions
With this module we can allow or deny specific IP or IP ranges. As for ranges we can use CIDR notation (/18) or subnet mask (255.255.255.0). Either one is fine. This module can also perform reverse DNS lookup in order to determine whether to block or allow.
We need to only allow client IP “20.55.200.223” to our FTP Site.
Open IIS Manager > FTP Site > FTP IP Address and Domain Restrictions > Add Allow Entry

But there is one more setting we need to perform, that is the default behavior for all unspecified clients. Specified clients are the ones in our list, right know we only have one IP address that is set to allow. However, by default, all unspecified clients are set to allow, defeating our purpose.
In the same module click > Edite Feature Settings > Deny.
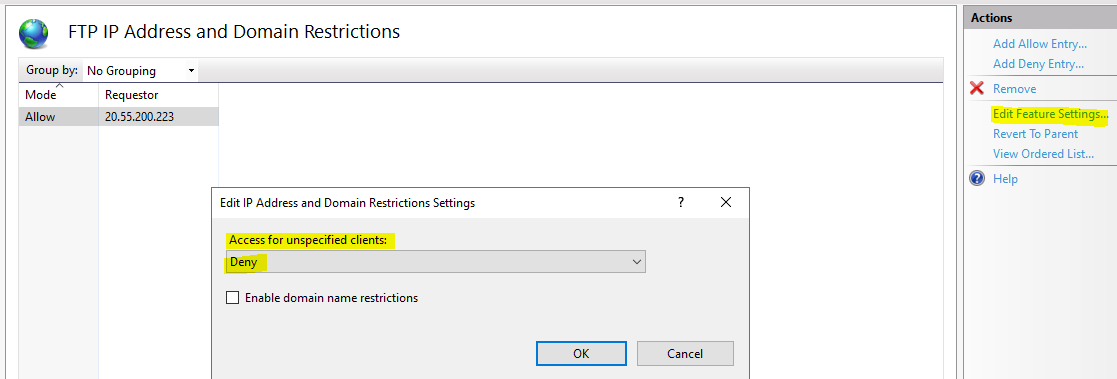
Now, if I connect FROM “20.55.200.223” to the FTP Server it connects
Just take note that, with this configuration you will not be able to connect to the FTP Server from FTP Server Itself. You need to allow access to localhost and to your own FTP Server.

FTP User Isolation
This modules allows us to place each client in specific sections of an FTP site. In doing so, we could avoid that a user can access other user content.
In order for this to work, the correct folder structure needs to be in place according to the type of user account.
| User Account Type | Physical Home Directory Structure |
|---|---|
| Anonymous Users | %ftproot%\LocalUser\Public |
| Local Windows User Accounts | %ftproot%\LocalUser\%username% “C:\sites\ftpsite01.com\LocalUser\user1” |
| Windows Domain Accounts | %ftproot%\%Domain%\%username% “C:\sites\ftpsite01.com\mydomain.com\user |
| IIS Manager or ASP.NET Custom User Accounts | %ftproot%\LocalUser\%username% “C:\sites\ftpsite01.com\LocalUser\user1” |
As for our example, we have local accounts. So, our directory structure needs to be as follows:

PS C:\sites\ftpsite01.com> tree /f
Folder PATH listing for volume Windows
C:.
│ computer.txt
│ test.txt
│
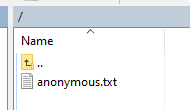
├───LocalUser
│ ├───Public
│ │ anonymous.txt
│ │
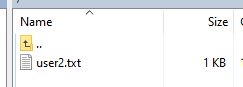
│ ├───user1
│ │ user1.txt
│ │
│ ├───user2
│ │ user2.txt
│ │
│ ├───user3
│ │ user3.txt
│ │
│ └───user4
│ user4.txt
│
└───_private
private.txt
Now each user is located in their respective folder.

If you do not have the correct folder structure, it will never work.
As for using User Isolation with Active Directory, this configuration is done in AD itself.
Third Scenario
As last assignments, we need to create another FTP with exact same configuration and files and our existing FTP site. We need to assign virtual host name, so that, one is accessible under “ftpsite01.com” and the other one under “ftpsite02.com”. Site 01 should be accessible over FTP and explicit FTPS, while site 02 should be accessible over FTP and implicit FTPS.
PS C:\sites> tree
Folder PATH listing for volume Windows
C:.
├───ftpsite01.com
│   ├───LocalUser
│   │   ├───Public
│   │   ├───user1
│   │   ├───user2
│   │   ├───user3
│   │   └───user4
│   └───_private
└───ftpsite02.com
    ├───LocalUser
    │   ├───Public
    │   ├───user1
    │   ├───user2
    │   ├───user3
    │   └───user4
    └───_private
Because we are being ask to connect with a domain name, we can take advantage of the “hosts” file and create an “A Record” for the domain names.
Hosts file located in “C:\Windows\System32\drivers\etc\hosts”
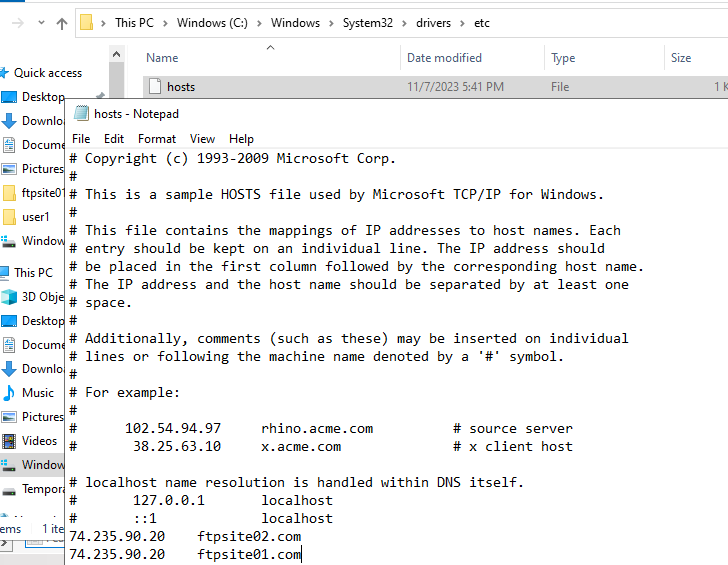
In order for this to work we need to use public IP Address. Otherwise we could have a mismatch of IP’s.
FTP Virtual Host Names
With this feature we can configure multiple FTP siteson a single IP Address by adding a hostname to it.

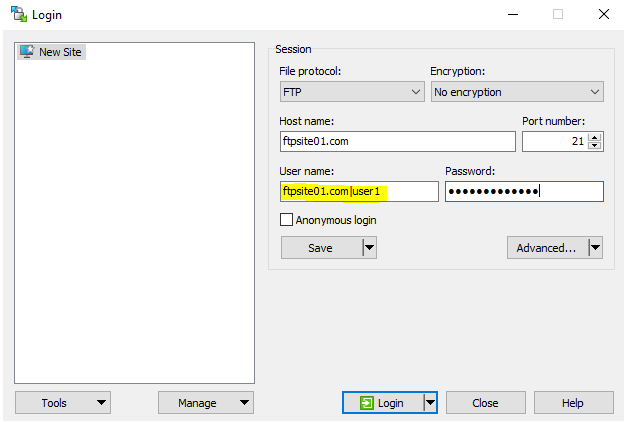
The trick when using virtual hostname is that we when prompted for the username, this should be in the following format:
- hostname|username
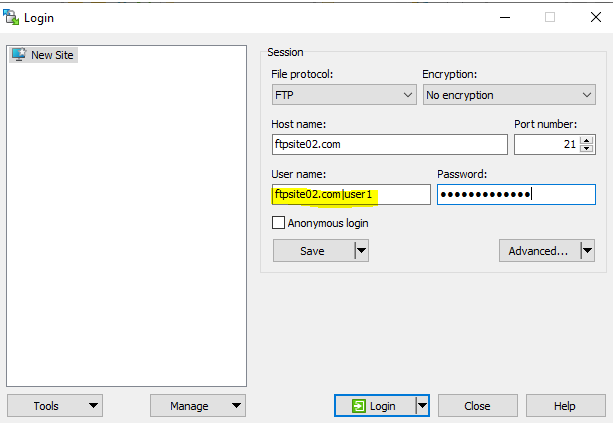
So, if “user1” wants to connect to ftpsite01.com, when prompted for username we should use:
- ftpsite01.com|user1
In our case,
-
Username: ftpsite01.com|user1
-
Host name: ftpsite01.com”

Connecting to “ftp://ftpsite02.com”…
Username: ftpsite02.com|user1
FTP SSL Settings - Explicit & Implicit FTPS
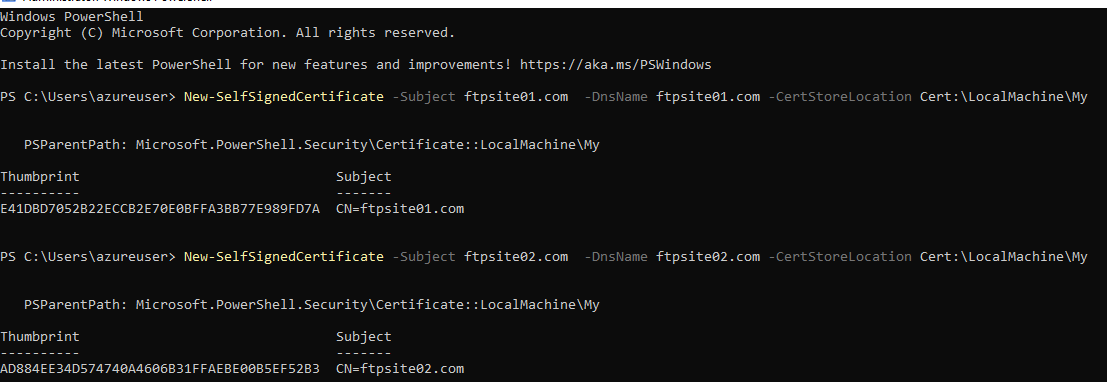
As you might know, to implement FTP over SSL, we need an SSL certificate. I am going to generate self-signed certificates with Powershell:
New-SelfSignedCertificate -Subject ftpsite01.com  -DnsName ftpsite01.com -CertStoreLocation Cert:\LocalMachine\My
New-SelfSignedCertificate -Subject ftpsite02.com  -DnsName ftpsite02.com -CertStoreLocation Cert:\LocalMachine\My
Now we have one certificate for “ftpsite01.com” and another certificate for “ftpsite02.com”.
Remember that implicit FTPS happens ONLY over port 990, while explicit FTPS can happen in any other port. We will use port 990 for implicit and port 21 for explicit FTPS and plain FTP.
To make our FTP site accessible over FTPS we need to attach a certificate to our FTP site. This IS NOT THE SAME as creating an HTTPS binding and selecting a certificate, this is a whole other protocol.
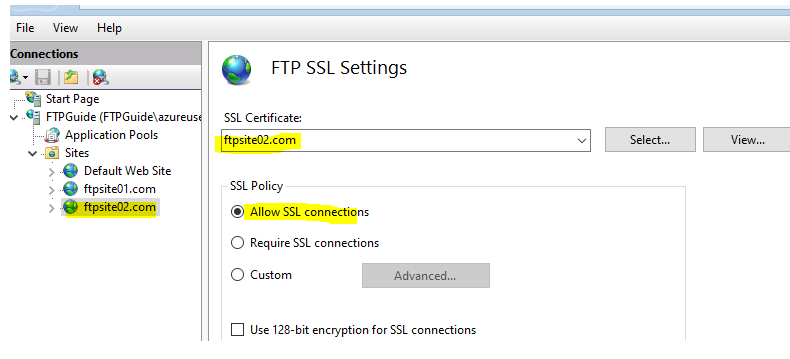
To implement this head over to your IIS FTP Site > FTP SSL settings > SELECT YOUR CERTIFICATE


In here we have three options:
1) Allow SSL connections: allows both plain FTP and FTPS.
2) Require SSL connections: allows ONLY FTPS connections.
3) Custom: you can manually configure the behavior over both FTP channels. Example you can allow both protocols over the command channel but enforce FTPS over data channel.
Did exact same process for our ftpsite02.com
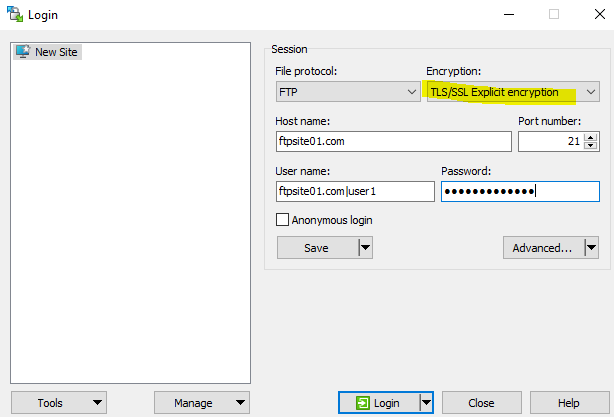
Ftpsite01.com should use explicit FTPS, as explicit FTPS can use any other port other than 990, then I will implement explicit FTPS over the same port that we are currently using: port 21.
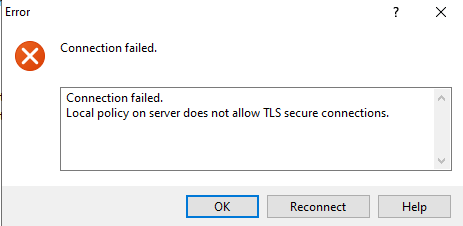
Hmm, “Connection failed. Local on server does not allow TLS secure connections.”
This happens because we do not have a specific binding. We will dig deeper into this in just a bit.
As for right now, let’s add this binding to out ftpsite01.com site:

Now we can connect:
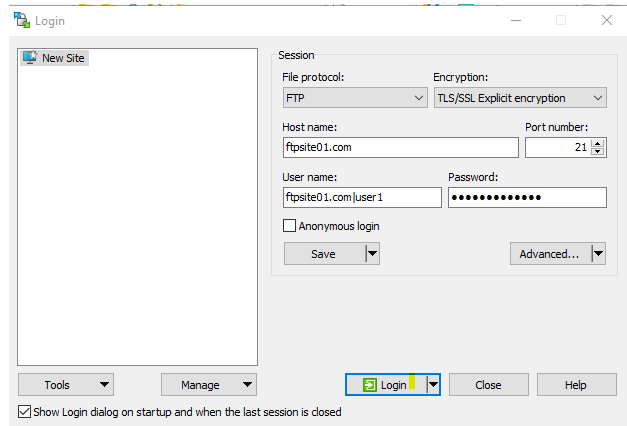

Let’s connect to “ftpsite01.com” with FileZilla. Remember we are testing explicit FTPS, technically when connecting the actual protocol is “ftpes://”.
There is no need to specify port because we are using the default 21, but if we would have set it up in another port, we need to specify port.

Why do we need a blank binding?
When a FTP client connects to an FTP Server, the Server needs to determine which certificate to use. However, the only information it has at that moment is the source, destination ports as well as the destination IP Address. It has no access to the hostname yet. So, if we do not have this blank binding, Server does not know which certificate to use and connection cannot be established.
Now, for ftpsite02.com we need this over implicit FTPS. As this happens over port 990, therefore, we need a blank FTP binding in port 990.
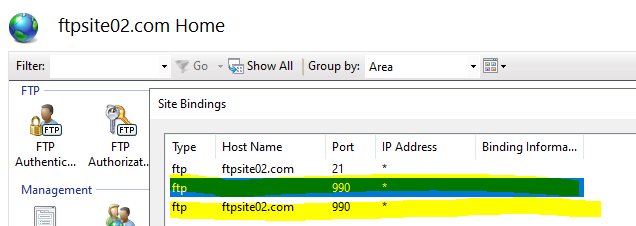
IIS already opened port 990 at Firewall level, but remember we also need to this at Azure VM level.

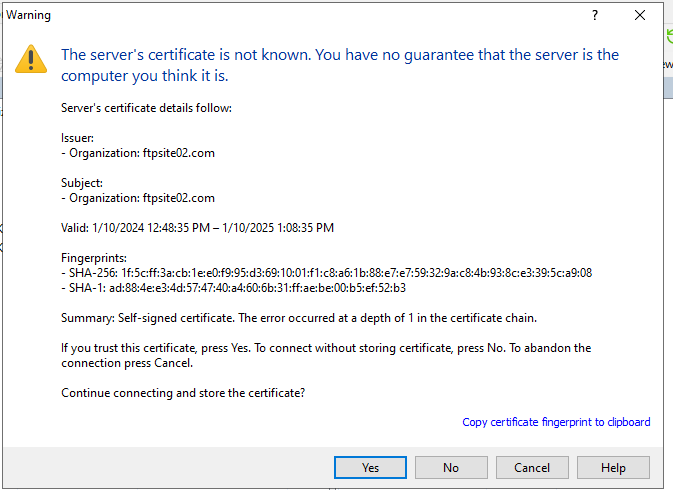
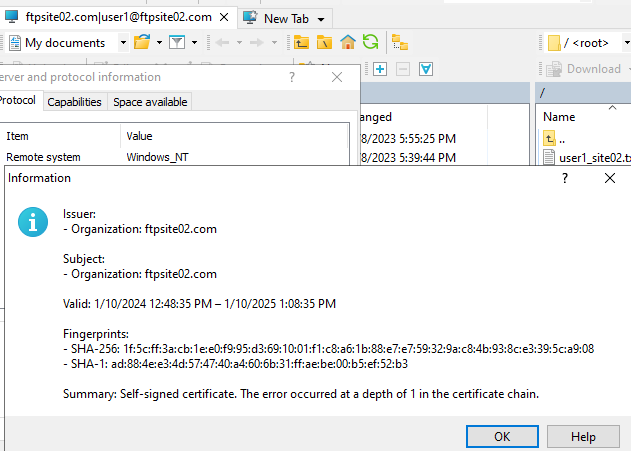
Filezilla, the actual protocol is “ftps://”. There is no need to specify port because it knows this is implicit and this happens over port 990.


So, our bindings look as follows:
ftpsite01.com:
<binding protocol="ftp" bindingInformation="*:21:ftpsite01.com" />
<binding protocol="ftp" bindingInformation="*:21:" />
ftpsite02.com:
<binding protocol="ftp" bindingInformation="*:21:ftpsite02.com" />
<binding protocol="ftp" bindingInformation="*:990:" />
<binding protocol="ftp" bindingInformation="*:990:ftpsite02.com" />
In Summary:
-
FTPS has two implementations: implicit (port 990) and explicit (any other port other than 990).
-
In order to implement FTPS, either implicit or explicit, a blank FTP binding is needed.
-
You can only have one certificate per IP. So, if you are hosting multiple FTP sites over FTP, which it is possible, all these sites under the same port would be sharing the certificate of the site the has the blank ftp binding for that port.
-
Ports need to be opened at Azure VM level and Firewall.
-
When modifying certificates, binding and ports, it is always best to restart the FTP Service. In general, if in doubt, restart FTP Service.
FTP Logging
Logging can be helpful in troubleshooting an issue. The scope of this guide is not troubleshooting, but I want to point out two things:
-
FTP logs are delayed by 6 minutes. If you want to flush service to write immediately, you can restart the FTP Service. So, let’s say your repro, and issue and you want to collect logs right away instead of waiting 6 minutes. Then, restart the FTP Service and collect your FTP Logs.
-
I would also recommend enabling “x-debug” field in the IIS FTP Logs. IIS FTP Site > FTP Logging > Select W3C Fields… > Additional Information (x-debug). It may give you good insight in your problem.

I hope you got something out of this.
Good luck and keep learning!